How Under Sink Water Filters Work: Simple Guide
This post contains affiliate links. As an Amazon Associate, we earn from qualifying purchases.
That metallic aftertaste in your morning coffee? The cloudy film on your drinking glasses? These everyday frustrations drive millions to install under-sink water filters, but few understand the fascinating science happening beneath their kitchen counter. Unlike basic pitcher filters, these systems transform your tap water through multiple purification stages, removing everything from microscopic parasites to dissolved lead—all without taking up counter space.
Whether you’re considering installation or troubleshooting your current system, understanding how these filters actually work helps you make smarter choices about water quality, maintenance timing, and system upgrades. Your under-sink water filter works through a sophisticated multi-stage process that combines mechanical filtration, chemical adsorption, and specialized media to deliver cleaner water with every pour.
Water Flow Through Your Under-Sink Filter System
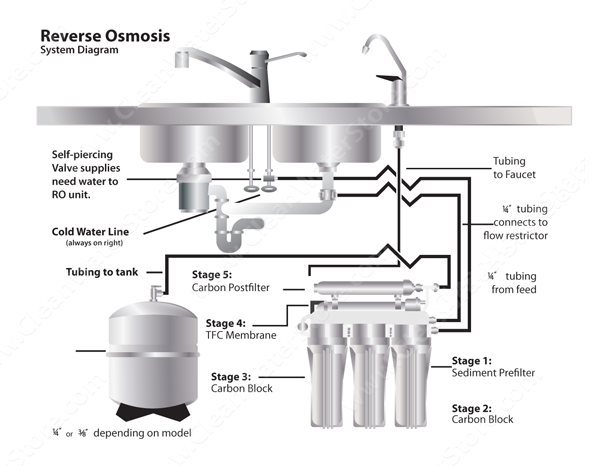
Your tap water begins a precise purification journey the moment you open the dedicated faucet. Cold water diverts from your home’s main supply line through a saddle valve connection, entering the first filtration chamber at 40-80 PSI household pressure. This pressure drives water through each stage sequentially, requiring no electricity while processing water at 0.5-1.0 gallons per minute—fast enough for daily use but slow enough to ensure thorough contaminant removal.
Sediment Pre-Filter Catches Visible Contaminants First
The first line of defense captures large particles before they reach delicate filtration media. A melt-blown polypropylene cartridge strains out sand, rust flakes, and pipe scale using 5-10 micron pores—small enough to trap particles invisible to the naked eye but large enough to maintain strong water pressure. This stage extends the life of subsequent filters by preventing premature clogging.
Warning signs for replacement: Noticeable pressure drop, cloudy water appearance, or after 3-6 months of use in areas with hard water. Don’t wait for visible problems—replace this filter on schedule to protect your entire system.
Activated Carbon Eliminates Chemicals and Odors
Water next flows through either granular activated carbon (GAC) or compressed carbon block media. Here’s where the magic happens: chlorine molecules undergo chemical reduction, transforming into harmless chloride ions. The carbon’s massive surface area—one teaspoon equals the area of a football field—adsorbs organic compounds like pesticides and pharmaceutical residues through van der Waals forces.
Performance indicators: Chlorine smell returns, taste degradation, or after 6-12 months of operation. Carbon filters work continuously, so they degrade gradually without obvious warning signs—stick to your replacement schedule.
Specialized Media Targets Problem Contaminants
Advanced systems add targeted filtration based on local water quality. Reverse osmosis membranes use 0.0001-micron pores to block dissolved solids like fluoride and nitrates. Ion exchange resin swaps hardness minerals (calcium/magnesium) for sodium ions, softening water without salt bags. KDF media (copper-zinc alloy) reduces heavy metals while inhibiting bacterial growth.
Pro tip: Check your annual water quality report to determine which specialized stages your home actually needs—don’t pay for filtration you don’t require.
Mechanical vs Chemical Filtration Processes Explained
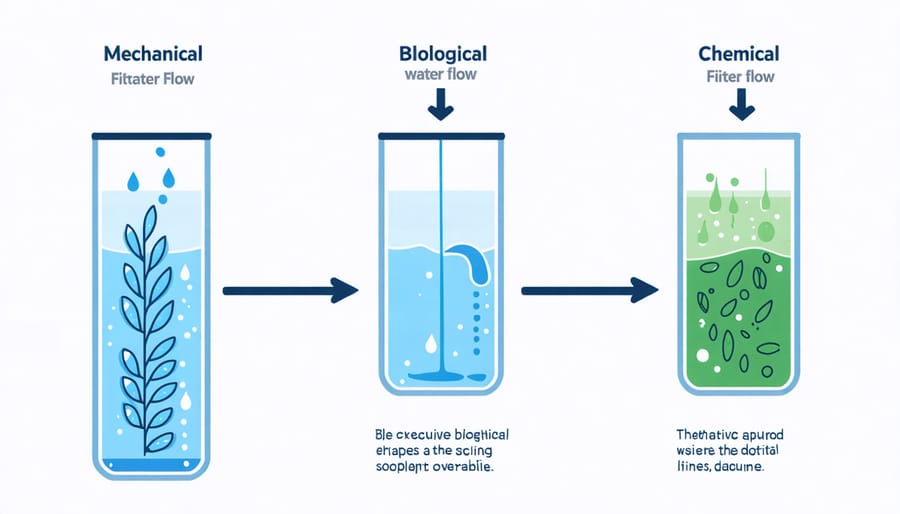
Under-sink filters employ two fundamental purification methods working simultaneously within the same cartridge system to deliver comprehensive protection.
Physical Filtration Blocks Particles by Size
Mechanical filtration works like a microscopic sieve, trapping contaminants larger than the filter’s pore size. Sediment filters use absolute ratings (exact particle size blocked) while carbon filters typically list nominal ratings (85% removal efficiency). This physical process removes:
- Sediment: Sand, silt, rust particles
- Cysts: Cryptosporidium and Giardia parasites
- Bacteria: Larger microbial organisms (with 0.2-micron ceramic filters)
Visual cue: Cloudiness in filtered water indicates mechanical filtration failure—replace filters immediately.
Chemical Adsorption Neutralizes Harmful Compounds
Activated carbon doesn’t just block chemicals—it chemically binds them through adsorption. Organic contaminants stick to carbon surfaces, removing:
- Chlorine and chloramines: Disinfection byproducts causing taste and odor
- Volatile Organic Compounds (VOCs): Pesticides and industrial chemicals
- Pharmaceutical residues: Trace medications in water supply
Expert note: Carbon filters become saturated over time—once they stop adsorbing contaminants, they start releasing previously trapped chemicals back into your water.
Under-Sink Filter Types and Their Performance Capabilities
Not all under-sink filters work the same way—your choice determines both contaminant removal capability and daily convenience.
Basic Single-Stage Carbon Systems
These compact units use one cartridge combining sediment and carbon filtration. They fit tight spaces and address chlorine taste/odor for $50-150 initial cost. However, they miss dissolved solids, heavy metals, and most chemical contaminants.
Best for: City water with good baseline quality, renters seeking basic improvement. Expect 0.5-1.0 GPM flow rate and 500-1000 gallon cartridge life.
Multi-Stage Comprehensive Filtration Systems
Three-to-four stage systems layer specialized media for complete protection. A typical progression: sediment filter → carbon block → heavy metal reduction → final polishing filter. These require 12″ x 14″ x 18″ minimum cabinet space but remove 95-99% of regulated contaminants.
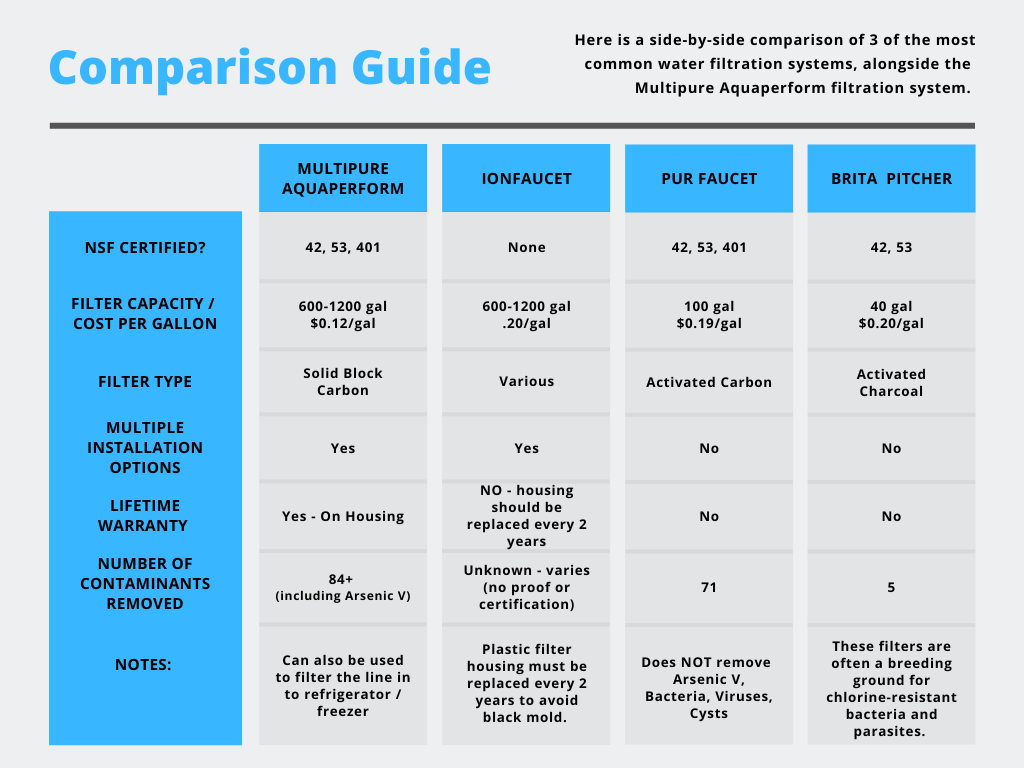
Performance specs: 0.5-1.0 GPM flow rate, 500-3000 gallon cartridge life, 40-80 PSI operating pressure. Look for NSF/ANSI 53 certification for health contaminant removal.
Reverse Osmosis Purification Systems
RO systems add a semi-permeable membrane after carbon stages, forcing water through 0.0001-micron pores. This creates purified water (15-25% recovery rate) and flushes concentrated waste down your drain. A 2-4 gallon storage tank ensures adequate flow despite slow membrane production (0.03-0.05 GPM).
Space requirements: Additional 15″ x 12″ x 18″ for tank plus air gap faucet installation. Ideal for homes with well water or high levels of dissolved solids.
Installation Process and Space Requirements
Most systems connect using standard 3/8-inch compression fittings, requiring only basic DIY skills and common household tools—typically taking 1-2 hours for experienced installers.
Connecting Your Under-Sink Filter System
- Shut off water supply: Close angle stop valve under sink
- Install tee connection: Add saddle valve or direct plumbing tee to supply line
- Mount filter housing: Secure bracket to cabinet wall using provided screws
- Install dedicated faucet: Drill 1-1/4″ hole for filtered water tap
- Connect tubing: Route lines from filter to faucet and drain (RO systems only)
Time-saving shortcut: Take photos during disassembly to simplify reconnection—most mistakes happen during reinstallation.
Cabinet Space Planning Essentials
Measure your cabinet before purchase—multi-stage systems need 2-4 inches clearance above housings for cartridge changes. Position the system where you can easily access filters and where water lines reach without kinking. RO systems require additional space for the storage tank and proper air gap installation.
Maintenance Schedules and Performance Monitoring
Filter effectiveness declines gradually, making proactive replacement critical for continued protection—don’t wait for obvious problems.
Recognizing When to Replace Filters
Immediate replacement needed when:
– Water pressure drops 30% or more
– Taste or odor returns
– Visible particles in filtered water
– Cartridge reaches manufacturer’s recommended lifespan
Monthly check: Run cold water for 30 seconds, then test TDS at filtered faucet. Rising numbers indicate membrane failure in RO systems.
Testing Your System’s Effectiveness
Simple TDS meters ($15-25) measure total dissolved solids reduction in RO systems—expect 85-98% reduction from baseline levels. Chlorine test strips verify carbon stage performance, showing 90-99% removal when systems work properly.
Pro tip: Keep a maintenance log tracking installation dates and replacement intervals—most performance issues stem from overdue filter changes.
Troubleshooting Low Water Pressure Issues
Weak water flow usually indicates clogged filters rather than system failure. Work backwards from the faucet to diagnose issues quickly without calling a plumber.
Diagnosing and Fixing Pressure Problems
First, check if your home’s water pressure dropped system-wide. Then replace the sediment pre-filter (most common culprit). If pressure remains low, carbon cartridges may be saturated—replace them even if under expected lifespan.
Quick diagnostic: Remove all cartridges and run water through empty housings. Strong flow confirms filter clogging rather than plumbing issues.
Preventing Future Flow Problems
Install a pressure gauge ($10-15) on the system inlet to monitor pressure drop across stages. Replace filters when pressure differential exceeds 15 PSI from baseline. Annual water testing helps size filters correctly for your specific contaminant levels.
Specialized Configurations for Unique Water Challenges
Beyond standard filtration, under-sink systems adapt to specific regional water problems through modular components.
Well Water System Adaptations
Homes with well water often add:
– UV sterilization chambers for bacterial protection
– Arsenic-specific media cartridges
– Scale inhibition filters for hard water
– Sediment filters with higher micron ratings for sand/silt issues
Lead Pipe Protection Strategies
If your home has lead pipes or fixtures, ensure your system carries NSF/ANSI 53 certification specifically for lead reduction. Look for KDF media or specialized ion exchange cartridges designed for heavy metal removal—standard carbon filters won’t effectively remove dissolved lead.
Certification Standards That Verify Performance
Reputable systems carry NSF certifications matching their claimed contaminant removal. These voluntary standards ensure third-party performance verification, unlike uncertified systems that may make false claims.
Essential Certifications to Check
- NSF/ANSI 42: Chlorine, taste, odor reduction (aesthetic)
- NSF/ANSI 53: Health effects like lead, cysts, VOCs
- NSF/ANSI 58: Reverse osmosis system performance
- NSF/ANSI 401: Emerging contaminants like pharmaceuticals
Red flag: Systems lacking certification for claimed contaminant removal likely won’t deliver promised performance—always verify certification numbers on manufacturer websites.
Your under-sink filter works tirelessly, processing thousands of gallons annually to deliver cleaner, safer water. Understanding how under sink water filter work helps you maintain peak performance, choose appropriate replacement schedules, and recognize when upgrades better serve your family’s needs. Test your water annually, track filter changes on your calendar, and remember that consistent maintenance prevents costly system failures while ensuring every glass meets your quality standards.