How to Change Whole House Water Filter Cartridge
This post contains affiliate links. As an Amazon Associate, we earn from qualifying purchases.
That morning shower suddenly feels weak, your ice maker sputters, and you notice a faint chlorine odor in the tap water. These aren’t random glitches—they’re your whole house water filter cartridge screaming for replacement. Unlike under-sink filters, this critical component silently shields every faucet, appliance, and family member from sediment, chlorine, and heavy metals. When it clogs, the consequences cascade through your entire plumbing system. Skip this maintenance, and you risk appliance damage, reduced water pressure, and compromised water quality.
This practical guide reveals the exact steps to change whole house water filter cartridge safely and efficiently—no plumber required. You’ll discover professional techniques to avoid stripped threads, prevent messy floods, and bypass common installation errors that cause leaks. Whether you’re replacing a standard 10-inch housing or a big blue canister, this process takes just 20 minutes with the right approach. Most importantly, you’ll learn the critical post-installation flush that ensures crystal-clear water flows from every tap immediately.
Essential Safety Equipment for Filter Replacement
Protective Gear Requirements You Can’t Skip
Never touch your filter housing without non-slip work gloves and safety goggles. These systems operate under 40-80 PSI pressure—when the housing finally breaks loose, you’ll face a torrent of murky water mixed with trapped sediment. Position a 5-gallon bucket directly beneath the housing before starting, as even a properly drained system releases 1-2 cups of residual water. Keep clean towels nearby to immediately address spills that could damage flooring or walls.
Water System Shutdown Protocol
Locate your main water shut-off valve, typically near your home’s foundation where the line enters. Turn clockwise until fully closed, then open the lowest faucet (like a basement sink or outdoor spigot) until water stops flowing completely. Critical step: Open two additional faucets—one on each upper floor—to accelerate pressure relief and prevent water hammer when restarting. Verify the system is depressurized by pressing the housing’s pressure relief button; if water sprays out, repeat the draining process.
Required Tools and Supplies Checklist
Filter-Specific Tools for Hassle-Free Removal
Your wrench choice makes or breaks this job. Strap wrenches work best for standard housings, while bowl-shaped wrenches grip big blue canisters securely without marring surfaces. Keep channel-lock pliers as a last resort for stubborn housings—they often deform plastic threads if overused. For pressure relief, a flat-head screwdriver is essential to depress the valve button. Pro tip: Wrap wrench jaws with electrical tape to prevent housing scratches during removal.
Critical Consumables for Leak-Proof Installation
- Exact replacement cartridge (mismatched micron ratings cause pressure drops)
- Food-grade silicone grease (never use petroleum-based lubricants)
- New O-rings (replace every third change even if they look intact)
- Fresh Teflon tape (for threaded connections only—apply clockwise in 3 layers)
Step-by-Step Filter Change Process
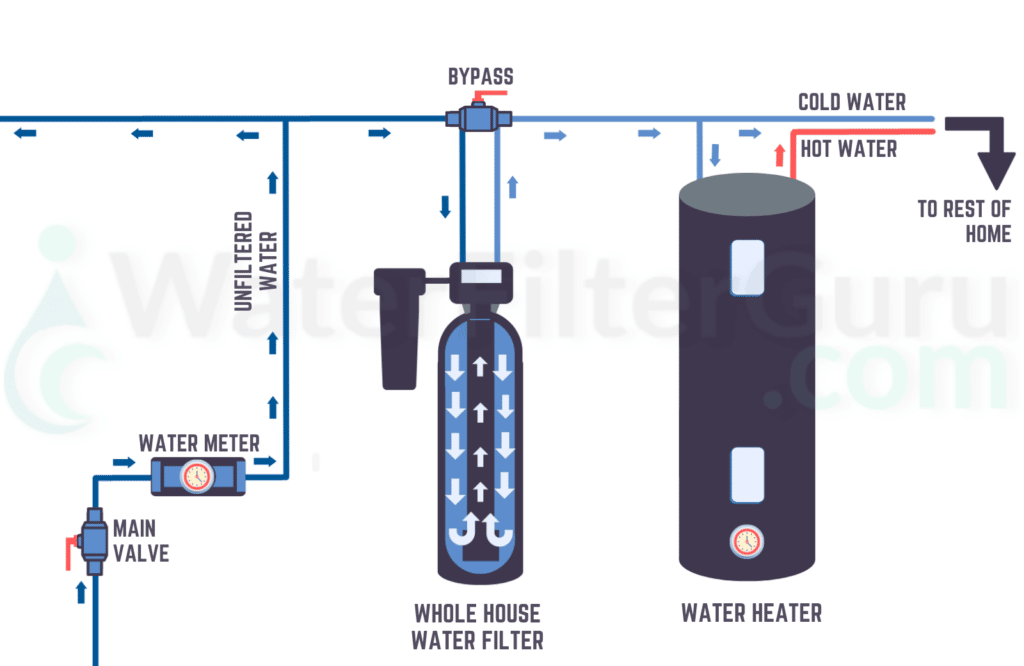
System Shutdown and Pressure Relief
Turn off main water supply at the shut-off valve and confirm flow stops at the lowest faucet. Press the pressure relief button on the housing with your screwdriver—expect a brief spray as trapped air escapes. Wait 2 minutes to ensure complete depressurization; rushing this step causes explosive water release when loosening the housing.
Remove Filter Housing Without Damage
Position your bucket directly under the housing. Fit your filter wrench firmly around the canister’s grooves and turn counterclockwise with steady pressure. Initial resistance is normal due to sediment sealing the threads—apply consistent force for 10-15 seconds. Once loose, finish unscrewing by hand to prevent cross-threading. Allow 2 minutes for complete drainage before handling the cartridge.
Replace Cartridge and O-Rings Correctly
Lift the old cartridge straight out and note the flow-direction arrows stamped on the end cap. Inspect the housing interior for sediment buildup; rinse with clean water if needed but never use brushes that scratch surfaces. Remove the old O-ring with a plastic pry tool (not metal!) and check the groove for nicks. Lubricate the new O-ring with silicone grease until shiny, then seat it smoothly into the groove—no twisting or pinching.
Install New Cartridge for Optimal Performance
Align the new cartridge with flow arrows pointing toward your home’s plumbing. Press firmly downward until it seats completely (you’ll feel a slight resistance). Hand-tighten the housing until snug against the O-ring, then use your wrench for only a 1/4 turn—overtightening cracks housings and guarantees future removal nightmares.
Restart and Test System Like a Pro
Open the main valve slowly over 10 seconds to prevent water hammer. Check connections under full pressure for 2 minutes, watching for slow drips—not just visible streams. Flush the system for 7-10 minutes at an outdoor spigot to clear carbon fines and trapped air. Monitor pressure at three faucets; if low flow persists, check for a stuck bypass valve.
Filter Change Frequencies by Type
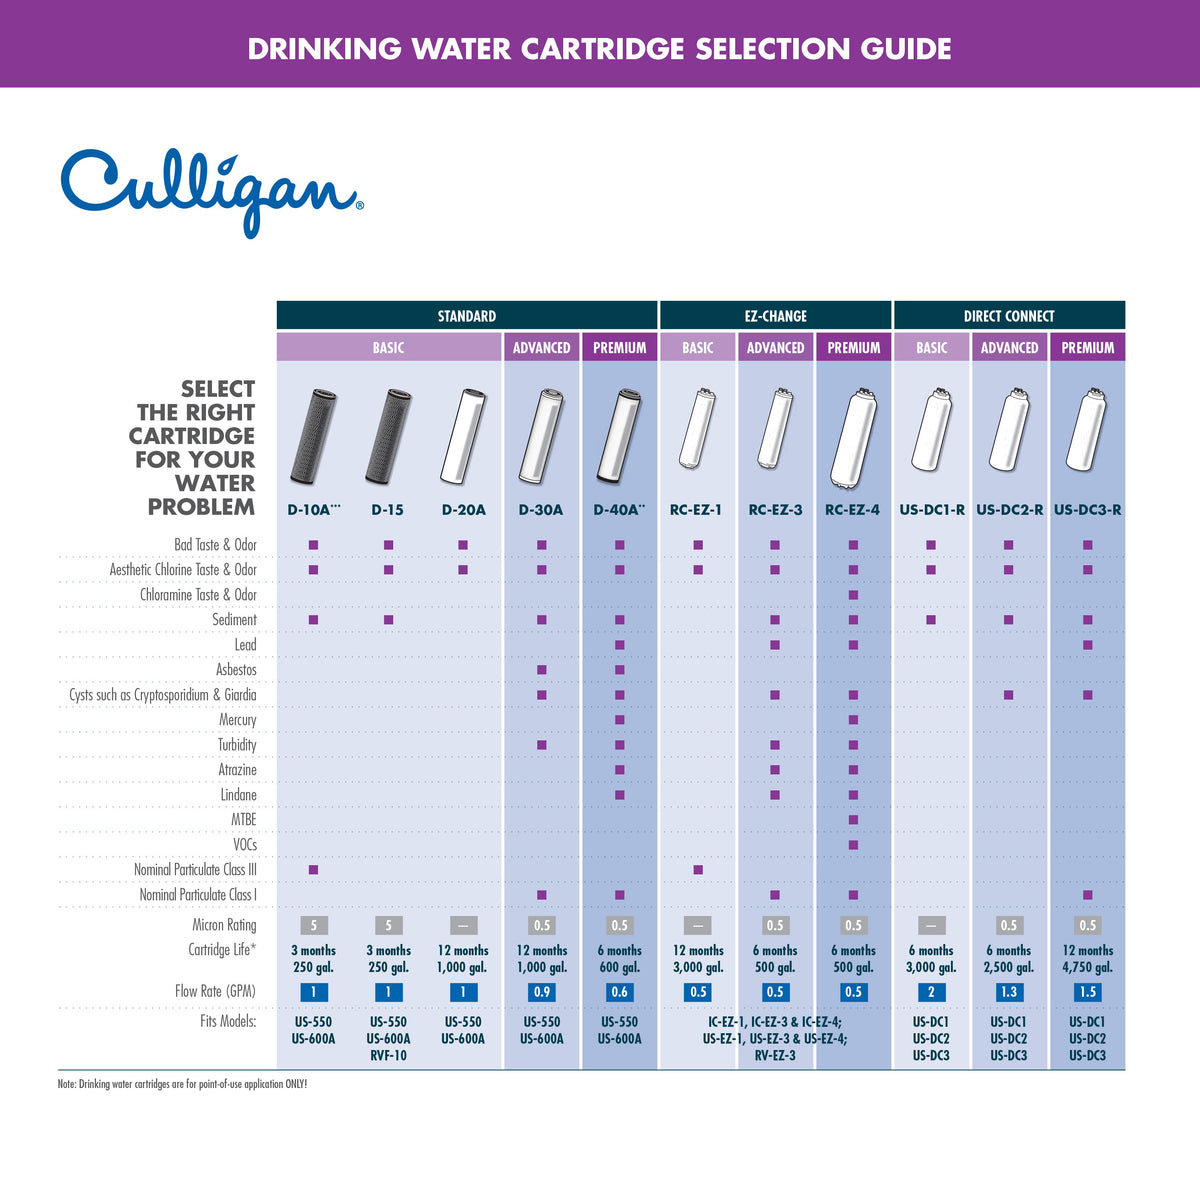
Sediment Filters: Timing Is Critical
- 5-micron polypropylene: Replace every 3-6 months (monthly in well water systems)
- Pleated washable: Rinse under faucet weekly; replace annually
- Gradient depth filters: Change every 6-12 months based on pressure drop
Carbon Filters: Avoid Contaminant Breakthrough
- Granular activated carbon: Replace every 6-12 months (sooner if chlorine smell returns)
- Carbon block: Same 6-12 month cycle; test water annually for effectiveness
- Catalytic carbon: Annual replacement mandatory for chloramine removal in municipal water
Well water alert: Double your replacement frequency due to higher sediment loads—track changes via pressure gauge drops.
Troubleshooting Common Problems
Housing Won’t Loosen: Break the Seal Safely
Apply penetrating oil around the seam and wait 15 minutes. Tap the housing’s edge with a rubber mallet—never metal tools—to break sediment bonds. Use a longer wrench for leverage (a 24″ pipe works as an extender), but stop if you hear plastic cracking. Apply heat with a hair dryer for 30 seconds to expand metal components before retrying.
Leaks After Installation: Fix in 5 Minutes
Check O-ring placement immediately—twisted rings cause 80% of leaks. Verify cartridge seating by removing and reinstalling; improper alignment stresses the O-ring. Back off overtightened housings by 1/8 turn—hand-tight plus 1/4 turn is always sufficient. Inspect threads for hairline cracks; replace damaged housings before restarting.
Low Pressure Issues: Diagnose Quickly
Confirm bypass valve status—many homeowners forget to close it after changes. Check pre-filter stages in multi-stage systems for clogs. Validate micron rating—a 1-micron sediment filter will choke flow in hard water areas. Flush longer (15+ minutes) if carbon fines clog aerators.
Maintenance Best Practices

Monthly Inspection Checklist
- Leak scan: Run fingers around housing seams for moisture (dripping starts slowly)
- Pressure test: Note baseline gauge reading; 10+ PSI drop signals clogging
- O-ring check: Look for flattened, cracked, or brittle rubber during changes
- Housing integrity: Shine flashlight on canister for stress cracks near threads
Documentation System That Prevents Future Headaches
Record change dates on a label taped to the housing—include cartridge model and micron rating. Track pressure readings in a notebook to predict clogging patterns. Note water quality changes like metallic tastes that indicate filter exhaustion. Keep warranty cards accessible; manufacturers often replace defective cartridges free.
When to Call Professionals
Persistent leaks after three resealing attempts signal housing damage. Cracked filter housings require full system replacement—never attempt epoxy repairs under pressure. Whole-house pressure drops (below 40 PSI) suggest deeper plumbing issues. Water quality failures with new filters indicate incorrect cartridge selection or system sizing errors.
Environmental Disposal Guidelines
Never toss cartridges in regular trash—carbon filters concentrate contaminants. Check manufacturer recycling programs; brands like Aquasana and Home Depot accept used cartridges. Dispose of sediment filters per local regulations—some municipalities classify them as hazardous waste. Rinse plastic housings before recycling to remove residual contaminants.
Final Note: Changing your whole house water filter cartridge isn’t just maintenance—it’s frontline defense for your family’s health and plumbing longevity. A $35 cartridge prevents $500+ in appliance repairs from sediment damage and ensures every shower, drink, and load of laundry gets clean water. Set phone reminders 2 weeks before your scheduled change date, and always keep an extra cartridge on hand. When you follow this exact process, you’ll never face weak pressure or murky water again—just pure, protected flow through every pipe in your home.