How to Install Whirlpool Whole House Water Filter
This post contains affiliate links. As an Amazon Associate, we earn from qualifying purchases.
That gritty texture in your shower water and stubborn hard water stains on faucets signal it’s time for a whole house water filter. Installing a Whirlpool system like the WHELJ1, WHESFC, or WHKF models transforms every drop flowing through your home—removing chlorine, sediment, and contaminants before they reach your taps. This step-by-step guide shows you exactly how to install a Whirlpool whole house water filter yourself, saving $300+ in professional fees while ensuring cleaner water for showers, laundry, and drinking. You’ll gain confidence handling plumbing connections, electrical setups, and critical safety checks specific to Whirlpool’s filtration systems.
Pinpoint Your Perfect Installation Location
Avoid costly rework by selecting the ideal spot on your main water line. Your Whirlpool filter must sit after the water meter but before pipes branch to appliances—this ensures every faucet gets filtered water. Measure for these non-negotiable clearances: 6 inches from all walls, 12 inches above for filter changes, and a level floor supporting 105+ pounds (WHELJ1 operational weight). Never install outdoors—the unit requires indoor temperatures between 40°F–100°F away from direct sunlight. Crucially, position it within 10 feet of a floor drain for regeneration cycles.
Pro Tip: Test floor strength first. Place a 50-pound weight where the bracket mounts—if it flexes, relocate to a basement support beam or concrete slab. Most homeowners install these in utility rooms or basements near the water meter.
Verify Your Home Meets Whirlpool’s Water Specifications

Don’t assume your plumbing is compatible—test before cutting pipes. Whirlpool systems like the WHELJ1 require 30–125 PSI water pressure (ideal range: 45–80 PSI), temperatures under 120°F, and flow rates of 7–15 gallons per minute (GPM). Iron must stay below 0.3 PPM and pH between 6.5–8.5. For a quick flow test, time how long it takes to fill a 5-gallon bucket at your bathtub faucet. If it takes under 45 seconds, you’ve got sufficient GPM for these filters.
Critical Check: Hard water over 10 grains per gallon (GPG) requires the WHESFC hybrid softener-filter model. Use Whirlpool’s included test strips to measure hardness before purchasing. Exceeding specs voids your warranty.
Gather Model-Specific Tools and Materials
Skip return trips to the hardware store with this exact checklist. For copper or PVC main lines, you’ll need pipe cutters rated for 1-inch diameter, two adjustable wrenches, and Teflon tape (3–4 wraps per connection). The Whirlpool kit provides bypass valves, mounting brackets, and 3/8-inch drain tubing—but bring your own 5-gallon bucket for flushing residue. Verify included items match your model: WHELJ1 requires a 120V GFCI outlet within 6 feet, while WHKF-DWHBB housing systems need silicone grease for O-rings.
Avoid This Mistake: Using standard PVC cement on drain lines. Whirlpool mandates compression fittings for 1-inch connections—never solvent-weld pipes directly to the filter head.
Isolate Water Supply Without Causing Pressure Surges
Shut off water correctly to prevent basement floods. Locate your main shutoff valve near the water meter and turn it clockwise until fully closed. Then open your lowest faucet (like a basement sink) to drain pressure, followed by the highest faucet (attic or second-story bathroom) to let air in. Confirm success by checking multiple fixtures—no drips should appear. Keep all faucets open during plumbing work to prevent trapped pressure from spraying water when cutting pipes.
Safety First: Wear safety glasses. Metal shards from cutting pipes can cause eye injuries—and skipping this step is the #1 cause of DIY installation injuries per Whirlpool’s service logs.
Cut Main Water Line for Flawless Filter Integration
Make clean cuts that prevent leaks after installation. Mark the main line 12–18 inches apart where the bypass valve will sit. Use a pipe cutter (not a hacksaw) to slice copper or PVC pipes smoothly. After cutting, deburr both ends with sandpaper and wipe clean with steel wool—this removes shavings that could clog filters later. Check for squareness by rolling the pipe; uneven cuts cause misaligned fittings.
Visual Cue: A proper cut leaves no lip or burrs. Run your finger along the edge—if it snags, deburr again. This step takes 90 seconds but prevents 90% of post-installation leaks.
Install Bypass Valve to Avoid Future Plumbing Emergencies
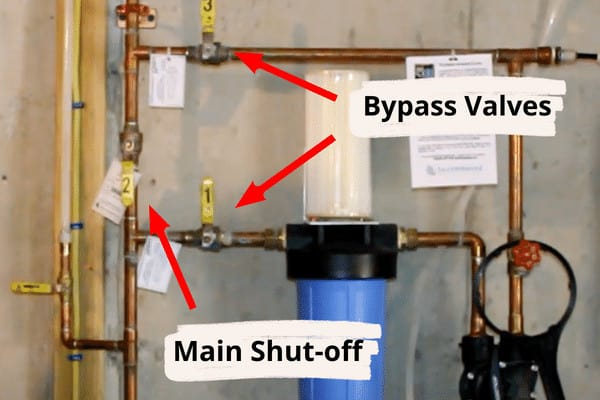
Set up the bypass valve for emergency filter changes. Apply Teflon tape clockwise on all male threads, then hand-tighten the valve body before giving a final ¼-turn with wrenches. Match the flow arrows to your water direction—reverse installation ruins the system. Test it immediately: move the handle smoothly between SERVICE (normal operation), BYPASS (water flows around filter), and OFF (emergency shutoff). If it sticks, disassemble and clean threads.
Pro Tip: Never overtighten. Whirlpool’s valves seal at hand-tight plus ¼-turn—excessive force cracks the housing. If leaks persist after tightening, add pipe dope (not extra tape) to the threads.
Mount System Bracket to Prevent Wall Damage
Secure the bracket into structural supports—not drywall. Use a stud finder to locate 16-inch centers, then drill ¼-inch pilot holes. Mount the bracket with provided lag screws, ensuring it’s perfectly level. Test stability by hanging a 50-pound weight—any flex means it’s not anchored properly. Remember: A full WHELJ1 weighs 105 pounds, and regeneration cycles create dynamic loads up to 125 pounds.
Critical Check: Whirlpool voids warranties if brackets aren’t mounted to wood studs or concrete. In basements with concrete walls, use sleeve anchors rated for 150+ pounds.
Connect Inlet/Outlet Lines Without Leaks
Follow this sequence for leak-proof plumbing. First, connect the inlet side: measure pipe length from bypass valve to filter, cut precisely, and install a shutoff valve within 3 feet of the unit. Use compression fittings (no soldering) for copper lines. Then repeat for the outlet side, ensuring flow arrows point toward your home’s plumbing. After connecting, pressure-test at 50 PSI for 15 minutes with a gauge—check all joints with a dry paper towel.
Fix Leaks Instantly: If water seeps, tighten ¼-turn. If that fails, disassemble, rewrap threads with fresh Teflon tape, and reconnect. Never crank wrenches beyond ½-turn past hand-tight.
Route Drain Line to Prevent Backflow Contamination
Install the drain tube correctly for safe regeneration cycles. Use the included 3/8-inch tubing to connect the valve’s drain port to a floor drain or utility sink. Secure it with clamps every 24 inches, avoiding kinks. Most importantly, create a 1-inch air gap where the tube terminates—this physical break stops wastewater from siphoning back into your clean water. Test flow by pouring a bucket of water through the line before finalizing connections.
Warning: Skipping the air gap violates plumbing codes and risks contaminating your entire water supply. Whirlpool’s warranty excludes damage from improper drain installation.
Program Control Valve for Automatic Maintenance
Set regeneration schedules in 5 minutes flat. For the WHELJ1, hold the PROGRAM button 3 seconds, set the current time, and select every 14 days at 2:00 AM (low-water-use hours). The WHESFC hybrid model requires hardness levels from your test strips—enter these to auto-calculate salt usage. Save settings by pressing PROGRAM again. Take photos of the display before closing the panel; power outages may reset configurations.
Pro Tip: Regeneration uses 50–100 gallons of water. Schedule it during off-peak hours to avoid pressure drops in municipal systems.
Flush System and Verify Performance
Complete startup with these final checks. Open the main shutoff valve slowly to fill the unit, then run the nearest faucet for 10 minutes to flush manufacturing residue (cloudy water is normal). Check all connections for leaks while pressurized. Finally, manually initiate regeneration: verify steady drain flow for 90–120 minutes and confirm pressure stays between 40–60 PSI. Test filtered water at your kitchen tap—it should lack chlorine smell and leave no sediment in a glass.
Performance Proof: Whirlpool filters reduce chlorine by 95%+ and sediment to <1 NTU turbidity. Annual bacteria testing is recommended for well water systems.
Register Warranty and Schedule Maintenance
Activate full coverage within 30 days. Register online with your proof of purchase—this extends coverage to 1 year for parts/labor, 3 years for electronics, and 10 years for tanks. Save this installation guide for future reference; Whirlpool requires it for warranty claims. Start monthly maintenance: check pressure gauges, inspect for leaks, and test regeneration cycles. Replace sediment pre-filters every 3 months (WHKF-GD05) or carbon blocks every 6 months (WHKF-DUF).
Final Tip: Bookmark Whirlpool’s support page ([email protected]) and save their 24/7 emergency line: 1-866-698-2538. With proper installation, your whole house filter delivers cleaner water for 10+ years.