How to Make a Survival Water Filter in the Wild
This post contains affiliate links. As an Amazon Associate, we earn from qualifying purchases.
Your throat burns with thirst after hours of hiking. That murky stream ahead could save you—or send you doubling over with giardia within hours. Never drink untreated wild water, even if it looks clear. Pathogens like E. coli and cryptosporidium are invisible killers. But you don’t need fancy gear to survive. This guide reveals exactly how to make a survival water filter in the wild using only natural materials you’ll find within minutes. You’ll build a multi-stage system that strips sediment, absorbs toxins, and—when combined with boiling—delivers safe drinking water. Forget complicated theories; we’ll get straight to the life-saving steps you need right now.
Spot Safe Water Sources Before Filtering
Choose Safer Water: Fast Streams Over Stagnant Ponds
Immediately skip stagnant ponds or puddles—they’re breeding grounds for pathogens. Target fast-flowing streams instead, especially those originating from high elevations. Clear water doesn’t mean safe water; microscopic threats lurk even in sparkling streams. If possible, collect from natural springs where water emerges directly from rock faces. Rainwater caught in clean leaves or hollowed wood is your second-best option. Avoid any water near animal trails, grazing areas, or downstream from human settlements—these almost always contain dangerous bacteria from waste runoff.
Skip Water with These 4 Dangerous Red Flags
Foam, oil sheens, or unnatural colors mean chemical contamination—walk away immediately. Visible animal waste on banks or mosquito larvae swarming the surface indicate heavy pathogen loads. Water with a chemical smell or taste (even after filtration) often contains agricultural runoff or industrial pollutants that basic filters can’t remove. Finally, skip water near dead animals or decaying vegetation—these release toxins that cause severe illness. When in doubt, find another source; your body can survive days without water but not days with poisoned water.
Gather These 5 Natural Filter Materials Right Now

Core Components: Sand, Gravel, Charcoal, Cloth, Grass
You need exactly five items, all found within minutes:
– Sand: Scoop clean river sand (avoid muddy clay). Wash it in clear water until runoff runs clear.
– Gravel: Collect pea-sized stones from streambeds.
– Charcoal: Burn hardwood (oak, maple, or birch) until blackened, then crush into pea-sized chunks. Never use treated lumber—it releases toxins.
– Cloth: A cotton bandana, t-shirt scrap, or clean sock works as a fine filter.
– Grass: Fresh green clippings from meadows create an instant debris screen.
Container Options: Bottle, Bamboo, or Birch Bark?
No plastic bottle? No problem. Slice bamboo 8-12 inches long with one sealed end, then punch drainage holes. Fold birch bark into a cone shape secured with vines. In emergencies, dig a 3-4 foot hole 2-3 feet from the water source and line it with leaves. Critical tip: Always pre-rinse containers with clean water to remove dirt.
Build a Multi-Stage Filter That Actually Works
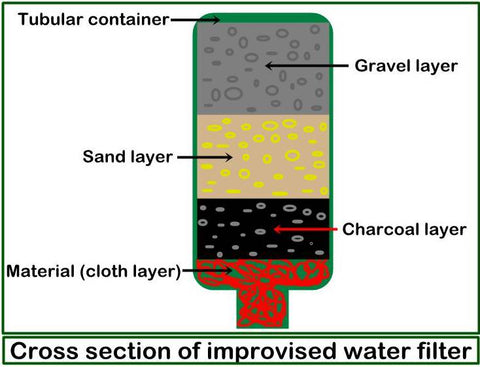
Layer 1: Block Debris with Fresh Grass
Pack 2 inches of grass at the filter’s base. Pour water through this first—it catches twigs, insects, and large particles before they clog finer layers. Without this step, your filter fails within minutes. Replace grass every 2-3 uses when it mats down.
Layer 2: Remove Particles with Gravel and Sand
Add in this exact order:
1. 1 inch of pea-sized gravel (traps medium debris)
2. 2 inches of coarse sand (removes smaller particles)
3. 2 inches of fine sand (captures silt and some bacteria)
Pro tip: Place cloth between layers to prevent mixing while maintaining flow. This stage removes 90% of visible contaminants.
Layer 3: Activate Charcoal to Kill Pathogens
Crush charcoal into uniform ¼-inch pieces—this is non-negotiable. Pack a 1.5-inch layer directly above the sand. Charcoal absorbs chemicals, eliminates odors, and reduces pathogens by binding toxins. Critical step: Steam-activate it by pouring boiling water over hot charcoal first—this triples its absorption capacity. Without activation, charcoal works poorly.
Layer 4: Polish Water with Cloth or Moss
End with a final barrier: Stretch clean cloth tightly over the filter’s top or add sphagnum moss. Moss adds natural antibacterial properties against giardia. This catches remaining micro-particles. Never skip this layer—your water will still look cloudy without it.
Make a Bottle Filter in 4 Minutes Flat
Quick Assembly: Cut, Invert, Layer, Test
When you have a plastic bottle:
1. Cut a 2-liter bottle horizontally through the middle
2. Invert the top half into the bottom half (like a funnel)
3. Layer materials from bottom up: grass → gravel → coarse sand → fine sand → charcoal → cloth
4. Test flow with a few ounces—water should drip steadily, not gush or stall
Warning: If flow stops, your layers are too thick. Reduce sand to 1.5 inches each.
Never Skip These Post-Filter Safety Steps
Boil Filtered Water: 1 Minute Minimum
Filtered water isn’t safe to drink yet. Pathogens like cryptosporidium survive filtration. Boil for:
– 1 full minute at sea level
– 3 minutes above 6,500 feet altitude
Watch for a rolling boil—vigorous bubbles throughout the water, not just at the edges. Cool in a covered container to prevent recontamination.
Solar Disinfection: 6 Hours in Sunlight
No fire? Use the sun. Fill a clear plastic bottle with filtered water and lay it on a reflective surface (like rock or foil) in direct sunlight for 6 hours. UV rays kill remaining bacteria. Only works on clear water—if it’s cloudy, filter twice first.
Troubleshoot Slow Flow or Cloudy Output
Fix Clogs Without Rebuilding
If water stops flowing:
– Remove the top cloth/grass layer and rinse debris under clean water
– Reduce sand thickness by ½ inch—too much sand causes clogs
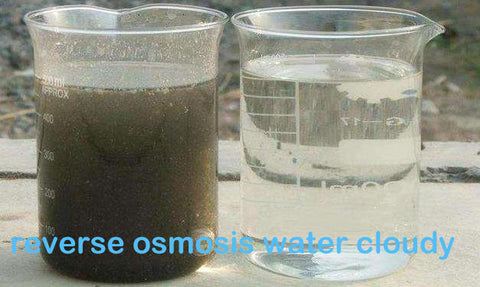
– Pre-settle murky water for 30 minutes before filtering
Never pour water faster than a slow drip—this bypasses filtration.
Clear Cloudy Water in 2 Passes
If output looks hazy:
1. Double-filter by running water through a second identical system
2. Add an extra ½ inch of fine sand or crushed charcoal
3. Insert a coffee filter (if available) as the final layer
Remember: Cloudiness means particles remain—not necessarily pathogens, but it’s a warning sign.
Scale Up for Groups: Double Your Output
Parallel Processing: Run 3 Filters at Once
For 2+ people: Build identical filters side-by-side. Assign one person to collect water, another to maintain filters. Use larger containers like 5-gallon buckets with punched holes. Time-saver: Pre-pack charcoal/sand in dry leaves for instant setup.
Maintain Filters for 72-Hour Survival
Replace charcoal every 48 hours—it stops absorbing toxins when saturated. Backwash gravel/sand layers by pouring clean water upward through the filter. Dry all components completely between uses to prevent bacterial growth. Store spare materials in waterproof containers (like hollowed bamboo).
Your survival water filter buys critical time until rescue—but it’s not foolproof. Always boil or solar-disinfect filtered water; no natural filter removes all viruses. Practice building one now using backyard materials so you’re ready when disaster strikes. Remember: clean water means clear thinking, and clear thinking saves lives. Stay safe, stay hydrated, and never drink from an unfiltered wild source again. For extreme scenarios, learn solar still construction next—it pulls water from damp soil when streams vanish.