How to Filter Microplastics from Bottled Water
This post contains affiliate links. As an Amazon Associate, we earn from qualifying purchases.
Microplastics have infiltrated 93% of bottled water brands worldwide, with single-use PET bottles releasing up to 100,000 plastic particles per liter through cap abrasion and bottle degradation. While municipal treatment plants remove 70-90% of particles larger than 1 micrometer, the remaining microplastics slip through undetected into your drinking water. These invisible contaminants—ranging from 1 micrometer to 5 millimeters—pose potential health risks that scientists are still working to fully understand.
The critical question isn’t whether your bottled water contains microplastics (it almost certainly does), but how effectively you can remove them before consumption. Standard water filters marketed for bottled water often fail to capture these microscopic particles, leaving consumers unprotected. Fortunately, specific filtration technologies can achieve 90-99% microplastic removal when properly selected and maintained. This guide delivers actionable methods to filter microplastics from bottled water using scientifically validated approaches and certified products.
Select the Right Filtration Technology for Microplastic Removal
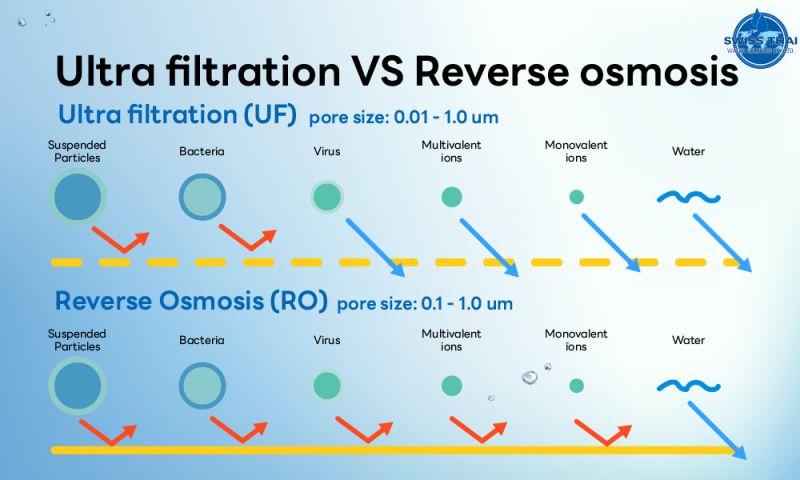
Identify Your Minimum Required Pore Size
Research confirms that membrane pore size of 0.2 micrometers or smaller achieves at least 90% removal of plastic fragments 80 micrometers and larger. Your filtration technology must meet this critical threshold to be effective against microplastics.
Reverse Osmosis Systems
– Pore size: 0.0001 micrometers
– Microplastic removal rate: >99%
– Requires 40-80 PSI water pressure
– Generates 2-4 liters wastewater per liter filtered
– Ideal for: Home installations where you regularly refill multiple bottles
Ultrafiltration Options
– Pore size: 0.01-0.1 micrometers
– Microplastic removal rate: 90-97%
– Zero wastewater production
– Best for: Portable bottled water filtration during travel
Certified Pitcher Filters
– Minimum effective pore size: 0.5 micrometers
– Removal rate: 85-100% (varies by particle size)
– Limited to 20-120 gallons capacity
– Perfect for: Occasional bottled water treatment at home
Avoid These Ineffective Microplastic Removal Methods
Many common “water filters” marketed for bottled water provide little to no protection against microplastics. Don’t waste your money on:
- Standard Brita pitchers: Only the Brita Elite model (with 0.5 micrometer hollow-fiber membrane) has NSF 401 certification for microplastics
- Activated carbon filters alone: Provide 0-60% removal and fail completely on particles smaller than 30 micrometers
- Boiling bottled water: Kills pathogens but zero microplastic removal, and may actually increase plastic leaching from containers
Choose Certified Products That Actually Remove Microplastics

Verify These Critical Certifications Before Buying
Not all “microplastic-removing” filters deliver as promised. Check for these certifications on product packaging or manufacturer websites:
| Standard | Minimum Reduction | Particle Size Targeted | Why It Matters |
|---|---|---|---|
| NSF 401 | ≥85% | 0.5-1 micrometer | Certified for bottled water microplastic removal |
| NSF 58 | >99% | 0.0001-1 micrometer | Gold standard for reverse osmosis systems |
| NSF P231 | ≥99.9999% | >1 micrometer | Verified microplastic and microbial removal |
Top-Performing Filters for Bottled Water Treatment

For Home Use
– Culligan Aquasential RO: Features Total Defense cartridge with >99% microplastic reduction, 3-5 year membrane life
– APEC RO-90: 0.0001 micrometer membrane with NSF 58 certification, processes 90 gallons daily
– ZeroWater 5-stage: NSF 401 certified, removes microplastics down to 0.5 micrometers, 20-gallon filter life
For On-the-Go Bottled Water
– LifeStraw Go 0.2μm: Bottle filter treats 1,000 liters, removes 99.999% of microplastic particles
– Brita Elite: 0.5 micrometer hollow-fiber membrane, 120-gallon capacity, designed specifically for bottled water
– Survivor Pro Portable RO: Travel-size reverse osmosis unit, filters 5-10 liters per hour from any water source
Budget-Friendly Option
– PUR PLUS: 0.5 micrometer pleated membrane, 40-gallon life, $30-40 initial cost with NSF 401 certification
Install and Activate Your Filter Correctly
Reverse Osmosis System Setup for Bottled Water
- Flush your new system with 2 liters of water to remove manufacturing residues that could contaminate your first filtered water
- Check water pressure—RO requires 40-80 PSI for optimal performance; use a pressure gauge if unsure
- Install pre-filters to extend membrane life, especially if treating water from questionable sources
- Document start date and set calendar reminders for filter changes at 25% capacity intervals
Pitcher Filter Activation Protocol
- Soak the cartridge in cold water for 15 minutes before first use to activate the membrane
- Flush 2 liters through the filter before drinking the water to remove carbon fines
- Prime electronic indicators (if equipped) by following manufacturer-specific instructions
- Mark capacity levels at 25% intervals on your pitcher or set digital reminders
Travel Bottle Filter Commissioning
- Fill and squeeze the first liter through the filter to clear carbon fines and activate the membrane
- Test flow rate—should produce a steady stream without excessive resistance (more than 5 seconds per ounce indicates problems)
- Record activation date permanently on the bottle to track usage
- Pack backup cartridge for trips exceeding 2 weeks duration to maintain protection
Prevent Secondary Contamination After Filtration
Proper Storage Techniques for Filtered Water
Your filtration work is wasted if you reintroduce microplastics during storage. Follow these critical protocols:
- Use glass or stainless steel containers for storing filtered water—never reuse the original plastic bottle
- Avoid direct sunlight on any plastic filter components to prevent degradation
- Keep temperatures below 40°C (104°F) to minimize plastic leaching from any remaining components
- Replace scratched pitchers immediately—scratches harbor bacteria and can release additional microplastics
Essential Cleaning Schedule
- Weekly: Wash pitcher and reservoir with hot, soapy water and a soft sponge (no abrasive pads)
- Monthly: Sanitize system with manufacturer-approved solution to prevent biofilm buildup
- After illness: Replace all filters and sanitize the entire system to eliminate contamination
- Post-plumbing work: Flush system thoroughly and consider filter replacement if water quality changed
Test Your Filtered Water for Microplastic Content
DIY Visual Assessment Methods
While home tests can’t detect nanoplastics, these methods verify microplastic removal:
Basic Visual Inspection
– Fill a clear glass with your filtered water
– Hold against bright light or use a phone flashlight behind it
– Look for floating particles or cloudiness (should be crystal clear)
– Compare side-by-side with unfiltered bottled water sample
Professional Testing Options
For definitive results, use these certified services:
- TapScore Advanced: $289, detects particles down to 1 micrometer, 10-12 day turnaround
- SimpleLab Microplastics: $199, 5 micrometer detection limit, 7-10 days processing
- Annual retesting recommended to confirm ongoing filter effectiveness
Interpreting Your Test Results
- <100 particles/L: Excellent filtration performance—continue current protocol
- 100-1,000 particles/L: Acceptable but monitor closely; consider filter replacement soon
- >1,000 particles/L: Replace filters immediately and check system integrity
Implement a Maintenance Schedule for Long-Term Protection
Critical Filter Replacement Timelines
Don’t wait for visible problems—replace filters based on these science-backed timelines:
- RO membranes: Every 3-5 years or when TDS rejection drops below 85%
- Pitcher cartridges: At rated capacity (20-120 gallons) or 6 months maximum, whichever comes first
- Travel bottle membranes: After 1,000 liters or 12 months regardless of use—plastic degrades over time
Troubleshooting Common Filter Issues
- Slow flow rate: Check for kinked lines (RO systems) or replace membrane (travel bottles)
- Cloudy output: Indicates membrane failure—replace filter immediately
- Off-tastes: Replace carbon post-filter and sanitize the entire system
- Reduced capacity: Could signal pre-filter clogging—clean or replace pre-filters
Essential Action Steps to Filter Microplastics from Bottled Water
- Choose membrane filtration with ≤0.2 micrometer pore size for ≥90% removal—this is non-negotiable for effective microplastic filtration
- Verify NSF 401, 58, or P231 certification before purchase—don’t trust marketing claims without certification
- Replace filters at rated capacity—never exceed manufacturer limits as effectiveness plummets beyond capacity
- Store filtered water in non-plastic containers—glass or stainless steel prevents secondary contamination
- Test annually with a certified lab to confirm your system’s ongoing effectiveness
Following these protocols delivers >95% microplastic reduction from bottled water sources. Your health investment pays dividends in reduced plastic exposure and improved water quality. Remember that no filter is 100% effective against nanoplastics (<1 micrometer), but implementing these science-backed filtration methods significantly reduces your exposure to the microplastics that have been proven to contaminate bottled water worldwide. By taking these steps, you transform your bottled water from a potential source of plastic ingestion into a cleaner, safer hydration option.